Showing posts with label Chicken. Show all posts

Thursday, June 19, 2014

Wink's Homemade Dog Food


Having a dog hasn't always been in our family future, I am more of a cat person, so I thought. We've been petless for 7 years since I had to put my last cat down, it was heartbreaking. We've always told the kids they can have a dog when they're grown lol. WELL, that all changed one day last November at the kid's race banquet when our friends brought one of their fosters with them to hang out. His name is Winks. He's a mix chihuahua (we think Chipuggle) and he's had eye trauma sometime before in his short 2 years so he only has use of his right eye, thus he's called Winks. Well Mr. took him as well as the kids, I was still hesitant but I LOVE the idea of a rescue pet. SO we decided to try out the 2 week foster to adopt with him. We loved him from the get go as well as he loved us! So he became ours. You can find him on Instagram as #MrWinks. :)


I got the idea of making his food from a friend online. I love the idea of making real food and not some processed dog food with who knows what. I've done a lot of reading and decided to combine some recipes to make mine. It's everything that you'd eat, chicken, veggies and brown rice. NO seasonings, they're not good for dogs. Winks loves it!! 

(I used chicken pieces this time)

Wink's Homemade Dog Food
1 batch should make 36 -1/4 cup size balls

4-5 C. cooked brown rice
2 plain whole chickens, about 4 lbs each
2 medium orange sweet potatoes (yams), chopped
8 whole carrots, chopped
16 oz frozen peas
2 small bunches fresh parsley leaves
2 small-medium bunches kale, stems removed
8 eggs
*I also now add an apple or two (peeled, quartered)

Roast chicken in 350' oven for about 1 hour 25 minutes or until juices run clear. As chickens are roasting, cook the rice (4 C. water & 2 C. rice) and let cool.

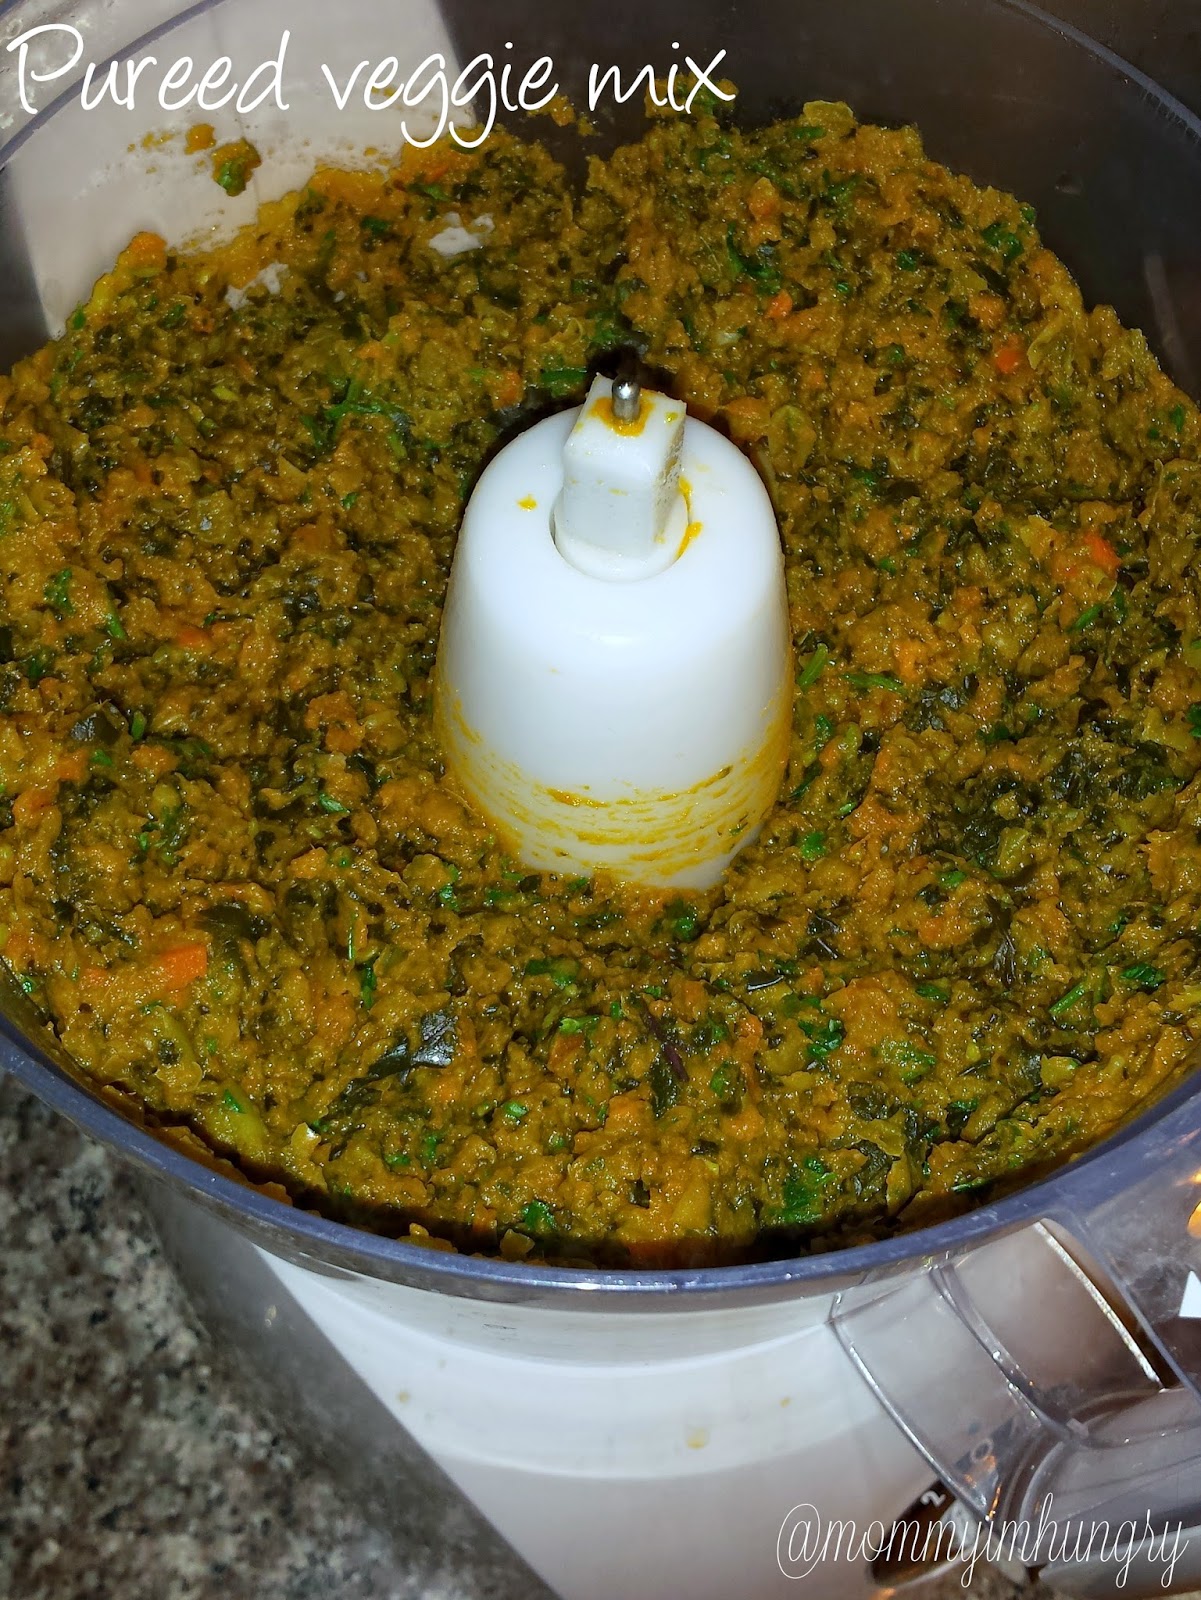
Peel and chop yams, and carrots, add to a large stock pot with about 1/2 cup water. Add in peas, kale and apple. Allow to boil then simmer until carrots and yams are tender, about 30 minutes. Transfer with a slotted spoon to remove any liquid to a food processor, add fresh parsley and pulse until pureed.

Cook scrambled eggs, plain.

Cool chicken, then pick apart and add meat to a large stand mixer. On medium speed, mix until chicken is shredded. Add in cooled rice, veggie puree and eggs . Using an ice cream scooper, scoop out portions onto a lined baking sheet. Flash freeze then place portions in a freezer safe container/baggie.

To use, keep a day or two worth in your fridge to thaw. I microwave thawed portions for 22 seconds, frozen for about 45 seconds. Feed to your furry baby.

Our dog is about 11 pounds and eats 1/2 C. - 3/4 C. of food a day.


enjoy,
Pin It!

Wednesday, January 22, 2014

Gluten Free Fried Chicken

You know when you see something or talk about something and you get that craving for it...yeah fried chicken happened to me. I saw a friend chicken show on tv, then we were talking about it at work. I haven't made or eaten it in ages (well except for these chicken strips) so I decided to look up a gluten free recipe. That's when I found this Thai inspired recipe for fried chicken. Yes, fish sauce and ginger in fried chicken! Don't let the ingredients throw you off though, you don't even really taste them and it wasn't real spicy, just delicious! All my family knew was how delicious the chicken was, nice and juicy, tender and of course they didn't miss the heavy breaded coating. The rice flour blend was a perfect coating, they loved that it was so crispy. I think I'll keep this recipe for a later use (we try not to eat a lot of fried foods).
You'll have to excuse the lighting for my photos and cell phone pics. 


Gluten Free Fried Chicken
adapted from Hey, That Tastes Good

8-10 chicken pieces, skin on
oil for frying
6 cloves of garlic, crushed
1/2 tsp pepper
3/4 tsp salt
1/3 C. fish sauce
1-2 TBL hot sauce
1 TBL fresh ginger, grated
1/2 C. rice flour
1/2 C. sweet rice flour
1/2 tsp cayenne powder

In a large bowl, mix together garlic, pepper, salt, fish sauce, hot sauce, and ginger. Add the chicken into the bowl, toss to coat, and let rest in the fridge for half an hour (or longer, I did mine all day). Heat 3/4" of oil over medium heat. Mix the rice flours and cayenne powder together. Take chicken pieces out of marinade and dredge in flour mixture. Fry in batches, a few minutes per side, until crisp and browned. If your meat isn't cooked (cut into a piece, if the juice doesn't run clear then keep cooking. Or, meat should be around 160 degrees), place on a cookie sheet and bake 350' 10-15 minutes until all the meat is cooked. (I kept mine in the hot oven to let it cook more)


enjoy,
Pin It!

Saturday, March 2, 2013

Sour Cream Chicken Enchiladas


There is a recipe blogged that my Husband likes for chicken enchiladas, but I was not in the mood to make gluten free cream of mushroom soup for it, so I decided to give these highly rated ones a try. So glad I did, because I loved the sauce on these. I went ahead and used some chicken and pork I had as leftovers, shredded and frozen for a later use, it came in handy! I wrapped a few up in my gluten free tortillas (liking Rudi's brand) and the rest in regular for them.

I served these with homemade Mexican ricehomemade slow cooker refried beans (to be linked) and gluten free cornbread.


Sour Cream Chicken Enchiladas 
adapted from mexican.food.com

1 lb chicken breast, diced (could also use beef or pork)
Salt and pepper to taste
1 medium onion, chopped
1 tablespoon canola oil
2 (4 ounce) cans chopped green chilies, divided
8 flour tortillas, softened (8 inches each, gluten free blend)
1 1/2 cups reduced fat Mexican blend cheese, divided
1/4 cup butter
1/4 cup flour (gluten free blend)
1 (15 ounce) can low sodium chicken broth (gluten free)
1 cup light sour cream

Season chicken with salt and pepper. In a fry pan, cook chicken and onion together in oil over medium-high heat until chicken is just done. Shred, combine with one can of green chilies. (I used some precooked chicken and pork I had frozen and shredded prior)
Divide cooked shredded chicken evenly between 8 tortillas; add 1 1/2 tablespoons cheese to each tortilla.

Roll enchiladas and place seam-side down in 9x13" baking dish that has been lightly sprayed with no-stick cooking spray.

Melt butter in a medium saucepan; stir in flour to make a roux; stir and cook until bubbly; gradually whisk in chicken broth then bring to boiling, stirring frequently.

Remove from heat; stir in sour cream and one can green chiles; pour sauce evenly over enchiladas.

Top with remaining 3/4 cup cheese (baking dish may be double-wrapped and frozen at this point) and bake at 400' for 20 minutes until cheese is melted and sauce near edges of baking dish is bubbly.

These worked great!

gluten free rolled enchiladas, no breakage!


mexican rice, cornbread and beans


Please share this post if you liked it. =)

enjoy,
Pin It!

Tuesday, February 19, 2013

Mesquite Chicken Tacos with Creamy Corn Salsa


We love tacos here so when I discovered this corn salsa I thought it'd be nice to try something new. These were fabulous, the chicken is marinated in a mesquite seasoning and with the creamy corn salsa makes these explode with more deliciousness. Serve with your favorite toppings and tortillas and enjoy!


Mesquite Chicken Tacos with Creamy Corn Salsa
adapted from Wendy Weekend Gourmet

Corn Salsa
1 1/2 cups thawed frozen corn kernels
1 finely diced seeded jalapeno
1/4 cup lowfat sour cream
1/4 cup mayo
1/2 tsp. cumin
1/4 cup finely diced red onion
salt and pepper to taste
1/4 tsp mesquite seasoning mix

Make the creamy corn salsa by combining all the ingredients in a bowl, stir well to combine and refrigerate until you're ready to serve the tacos.

Mesquite Marinade
Juice of 3 limes
1 tbs. olive oil
2 tbs. mesquite seasoning mix
2 tbs. honey
salt and pepper to taste
1 1/2 lb chicken breasts

In a large bowl whisk ingredients (except chicken) well to combine then add chicken breast. Toss well to coat and refrigerate for 2-4 hours -- the longer you marinate, the better the flavor will be. 
Heat a large non-stick skillet or cast-iron grill pan over med-high heat. Add about 1 tbs. olive oil and heat for about five minutes. Brown the chicken well on all sides until cooked through -- about 5 minutes per side (I grilled my chicken).
Transfer the chicken to a cutting board. Let it rest for five minutes, then slice into bite-size pieces. 
Steam 8 corn tortillas using a damp kitchen towel and microwaving for about 1 minute. 
Assemble tacos as desired, can add additional taco toppings if you like.


Please share this post if you liked it. =)
enjoy,
Pin It!

Friday, February 15, 2013

Grilled Ham and Cheese Chicken Burgers with Roasted Potato Fries


Winner winner chicken dinner! I came across these burgers and decided to give them a go, such easy ingredients! Since these are soft tender patties, I chilled mine for a few hours to help them firm up (could also freeze them) and cooked them on my grill grate tray thing (see photo) so they'd hold up a little better. The ham and parmesan cheeses were really good in these. We all enjoyed them and will definitely keep in our files.


Grilled Ham and Cheese Chicken Burgers 
slightly adapted from Smoked 'n Grilled 

1 lb. ground chicken breast
1/2 cup cooked diced ham
2/3 cup Parmesan/Asiago cheese (shredded)
Salt & pepper to taste

 Mix all the ingredients together and form into 4 patties. Cover and chill for a few hours. Cook over a medium hot grill until just cooked through. About 8 to 10 minutes.

Add your favorite toppings and buns (we used lettuce, tomato, red onion, mayo and white american cheese).

grilling!

I made myself gluten free buns (they're really flat but were great)

For the fries, I sliced Yukon gold potatoes in half lengthwise, tossed with a little oil, salt and pepper. Roasted in a 425' oven on a parchment lined baking sheet, cut side down for about 40 mins. They'll have crispy outsides and fluffy insides. My fave!


see the ham throughout the chicken patty


Please share this post if you liked it. =)

enjoy,
Rachelle
Pin It!

Wednesday, January 30, 2013

Sticky Coconut Chicken


This has become a family favorite since I saw it a few months ago. The coconut milk tenderizes the chicken so it's nice and tender as well as flavorful. The sauce is delicious drizzled over the chicken and a little rice and veggies.


Sticky Coconut Chicken 
slightly adapted from Your Homebased Mom

6-8 boneless chicken thighs or 11/2 lb boneless chicken breasts
1 can coconut milk
1 Tbsp. minced ginger
1 tsp. fresh ground pepper
1 tsp. red pepper flakes

Marinade chicken in coconut milk, ginger, pepper and red pepper flakes at least one hour (I do mine 24 hrs or that morning). Grill on barbecue, about 4 minutes a side on medium heat. Discard marinade.


Chili Glaze:
3/4 cup rice vinegar
1/2 cup sugar
3 Tbsp. soy sauce (or GF Tamari)
1 tsp. red pepper flakes

Bring above ingredients to a boil over high heat and cook until mixture is reduced and thickened. 8-10 minutes depending on the size of your pan. Watch it, do not let it burn. Glaze chicken and serve.


Please share this post if you liked it. =)
enjoy,
Pin It!

Sunday, November 4, 2012

Oven Tacos


Thought we'd give these oven tacos a try, something new. Actually the thought of having it half way assembled sounded pretty good, it's hard to fill a taco shell sometimes, especially little hands. This way the meat mixture and cheese is baked into the shell so spillage is eliminated. A bonus to these delicious tacos is the shell doesn't crack all over the place when eating either. I read in comments that some turned out soggy, but mine did not, I guess I let the meat mixture cook down a little more? The shells will be softer but not in a bad way. We loved them, the meat mixture was very good.


Oven Tacos
adapted from Blog Chef

2 lbs ground beef (or turkey/chicken)
1 small onion diced
1 small can diced green chilies
1 recipe for Homemade taco seasoning (below)
1 (8 ounce) can low sodium tomato sauce
1 (16 ounce) can fat free refried beans
2 cups shredded reduced fat Colby-jack cheese
18-20 hard taco shells {if gluten free, be sure they are}

Optional Condiments-
Lettuce (shredded)
Tomato (diced)
Salsa
Guacamole
Sour Cream
Olives, sliced 

Preheat the oven to 400 degrees. 

In a large skillet brown ground beef and onion over medium-high heat. Drain off any excess liquid. Return to pan, add chilies, refried beans, tomato sauce, and taco seasoning. Mix well and cook for a few minutes if mixture seems runny.

Spoon the taco meat mixture into the taco shells and place into a 9 x 13 inch baking dish (OR check out The Taco Rack), standing up. Sprinkle cheese over the top of the taco meat in each shell. Place into the oven and bake at 400 degrees for 10-12 minutes or until the cheese has melted and the tacos are heated through.
Remove from the oven and top with any optional condiments for serving.

Taco Seasoning
1 tablespoon chili powder
1/4 teaspoon garlic powder
1/4 teaspoon onion powder
1/4 teaspoon crushed red pepper flakes
1/4 teaspoon dried oregano
1/2 teaspoon paprika
1 1/2 teaspoons ground cumin
1 teaspoon sea salt
1 teaspoon black pepper

In a small bowl, mix all together. Store in an airtight container.
I used all of this on 2 lbs of ground meat with a little water mixed in.


Please share this post if you liked it. =)
enjoy,

Pin It!

Friday, September 21, 2012

Fried Rice


I love fried rice, but sadly can't eat it from take away anymore since I doubt they have a gluten free option, SO I make my own. I have combined two of my fave recipes to one I like. You could call this leftover rice, since it's best made with day old rice, meats and with frozen veggies it comes together quickly. I have been making this for a while now and meant to blog it, so after I made this for dinner tonight, I sat my butt down and wrote this for you. (these photos are from last July!! I've been hiding this recipe from you all since then. lol)


Fried Rice
adapted from Cooking with Kai and Steamy Kitchen

4 Cups cooked leftover rice
1/4 lb thinly sliced or diced raw meat/shrimp/tofu/spam (or use cooked leftovers)
1/4 Cup veggies (frozen peas and carrots)
3 eggs, lightly beaten
2 Tbl cooking oil
3 green onions, sliced for garnish

Sauce
3 Tbl low sodium tamari (soy sauce)
1 tsp sesame oil
2 tsp shaoxing rice wine
2 tsp fish sauce
1 tsp minced garlic
1/2 tsp sugar (optional)

Combine all sauce ingredients, set aside. Add oil to a large hot skillet, cook meat for 2-3 minutes (you could add a little bit of sauce while cooking the meat). Remove from pan and set aside. Add eggs and scramble for about 1 minute. Add in rice, meat and veggies allow to heat through.
Add in the sauce ingredients, allow to heat through. Garnish with green onions.

spam fried rice


Please share this post if you liked it. =)

enjoy,

Pin It!

Sunday, August 12, 2012

Pesto and Cheese Stuffed Pork Chops


Here's a great recipe I sort of came up with after searching around the net for something similar. This recipe would be great with any cut of meat really, chicken, beef, veal...it's Italian flavors full of pesto and cheese. I served it along side creamy mashed potatoes and a veggie. My chops were really thin, but I recommend using thick cut for better pockets. We loved this and will be adding it to our regular menu.


Pesto and Cheese Stuffed Pork Chops

2 low fat string cheese sticks, cut lengthwise into 4 pieces
2 tablespoons basil pesto
2 cloves garlic, minced
4 pork loin chops or boneless pork loin chops, cut 1-1/4 inches thick
1 teaspoon freshly ground black pepper
1/2 tsp salt
1 teaspoon dried oregano
1/4 teaspoon dried thyme, crushed
2 Tbl olive oil
8oz. can low sodium tomato sauce
Chopped fresh basil for garnish

Make a pocket in each chop by cutting horizontally from the fat side almost to the bone or the opposite side. Lay a piece of cut string cheese and scoop a little pesto and garlic inside each pork chop. If necessary, secure the opening with a wooden toothpick.
Season pork chops with salt, pepper, oregano and thyme.
In a large medium-hot skillet heat oil, cook pork chops 3-4 minutes per side until golden brown. Add tomato sauce and let simmer for about 8-10 more minuites or until pork chops are cooked through. Garnish with fresh basil, serve.


Please share this post if you liked it. =)
enjoy,

Pin It!

Saturday, May 19, 2012

Gluten Free Sour Cream Chicken Quiche


It's been four years since I made this quiche, wow. So glad I remembered it because I really do love it. Now I can make it gluten free and it still tastes the same (for the regular version click here). Plus it gave me a reason to blog about this gluten free crust which I was talking about but realized I never did blog it.

Anyways, you can make the crust ahead of time and even precook the chicken and peppers. I added green onions to the top before baking. Once this quiche is cooked, I like it to sit out a little to cool off and set up otherwise it just falls apart when taking it out of the pie dish. The crust came out great (I've made it a handful of times now) and doesn't really taste different than regular gluten crust. It's lightly golden and flaky. Mr. had 3 pieces of this quiche. I'll have one for lunch tomorrow (cold of course).


Gluten Free Sour Cream Chicken Quiche
adapted from my original post

1 (9 inch) gluten free pie crust
1 tablespoon olive oil
1/4 cup chopped onion
1/4 cup chopped bell pepper (I use a trio blend of peppers)
1 tablespoon gluten free flour blend (I used pie crust flour blend)
1 cup chopped cooked chicken breast
1/4 teaspoon salt
1/4 teaspoon ground nutmeg
1/4 teaspoon black pepper
1/2 cup shredded reduced fat Cheddar cheese
1/4 cup shredded reduced fat Swiss cheese
2 eggs, slightly beaten
3/4 cup 2% milk
3/4 cup light sour cream

Preheat oven to 400 degrees F (200 degrees C). Line a 9 inch pie plate with pie crust. Keep in refrigerator until ready to fill.

In medium frying pan, heat olive oil on medium-high. Add onion and bell pepper. Cook three minutes, stirring frequently. Add flour and cook for two minutes, stirring frequently. Stir in chicken, salt, nutmeg and pepper. Spread this mixture over bottom of unbaked pie shell and top with Cheddar and Swiss cheese.

Combine eggs, milk and sour cream, mix until smooth. Pour over chicken mixture.

Bake in preheated oven for 20 minutes. Reduce temperature to 350 degrees F (175 degrees C) and bake 30 to 35 minutes until inserted knife comes out clean. Allow to cool a little before serving.

I made two, just for the leftovers


Did you like this post? If so, please comment, share it and PIN it! =)

enjoy,
Pin It!
Related Posts Plugin for WordPress, Blogger...