Thursday, April 25, 2013

Asparagus Ham and Swiss Egg Casserole


Baked eggs are a time saver as you're rushing around in the morning. You can add in your favorite veggies or meats to make them extra special. Throw these in the oven and get ready while they bake for about 30 minutes. These were another item I made for my Eggland's Best breakfast. I loved them so much, I made them again to have during the week for a quick breakfast, just warm in the microwave. They turn out fluffy and delicious.


Asparagus Ham and Swiss Egg Casserole
inspired from The Perfect Pantry and here
Serves 5-6

1 medium onion, diced
1/2 cup chopped asparagus
1/2 cup roughly chopped mushrooms
1/2 cup cooked chopped ham
8 large eggs
2 Tbsp nonfat milk
7 oz shredded swiss
1/4 tsp kosher salt
1/2 tsp fresh black pepper
Cooking spray

Preheat the oven to 375°F.

In a medium skillet, saute asparagus in a little oil, butter or spray (or steam in a little water) until just tender. Set aside. Add mushrooms and a little spray, oil or butter and saute mushrooms until tender and golden.

Spray a 2.5 qt. glass casserole dish with cooking spray. Spread the vegetables and ham in the dish, and allow them to cool slightly while you prepare the remaining ingredients.

In a large bowl, whisk the eggs until slightly frothy. Add the milk, and whisk to combine. With a rubber spatula, stir in the shredded cheese, salt and pepper.

Pour the egg mixture over the vegetables in the casserole dish. Draw the spatula through the mixture to bring some of the vegetables to the surface.

Bake, uncovered, for 35 minutes, until the eggs are puffy. Serve hot, warm or cold.


I ran out of non stick spray this time, parchment worked fine


Please share this post if you liked it. =)

enjoy,

Tuesday, April 23, 2013

Homemade Ranch Dressing


Homemade ranch dressing! My family is ever so thankful I found this recipe! They LOVE the stuff but I hate buying it all the time. Now I can mix up a bunch of the dry ingredients and make it as I need it. I am not a ranch dressing lover, BUT I like this recipe. Please click over for the larger quantity size recipe, I found a smaller quantity in the comments and I have adapted it here.


Homemade Ranch Dressing
adapted from The Crafty Blog Stalker

Ranch Dry Master Mix
1/2 TBL Black Pepper
2 1/2 TBL Parsley Flakes
3/4 tsp Kosher Salt
2 1/2 TBL Garlic Powder
1 1/2 TBL Onion Powder
3/4 tsp Dill Weed

Combine all, keep in a sealed container. Use with dressing recipe below.

Ranch Dressing
1 TBL dry master mix (see above)
1 cup light mayo
1 cup cultured low fat buttermilk
3/4 cup light sour cream
1/2 tsp lemon juice

Combine all in a bowl and stir well. Chill for a few hours for best flavor. Keep in a covered container/jar in the fridge. Makes about 3 cups.

*note, you can freeze buttermilk, just thaw and use in desired recipe, like this one when it runs out.

the jar of dry master mix, remember to use 1 TBL with the wet ingredients!

ready to eat! mmm!

great as a dip for homemade chicken strips too!

my new fave! oven fries with S&P dipped in this ranch!


Please share this post if you liked it. =)

enjoy,

Monday, April 22, 2013

Lemon Ricotta Crepes


Funny how I've never made crepes before, and now I've made them a few times. They're really easy and you can fill them with anything. I made these for my Eggland's Best little breakfast. The lemon and ricotta were a lovely addition.

For these lemon crepes I used a gluten free recipe from a cookbook I blogged about here. I added in the lemon juice and zest. There are many GF recipes on the web if you'd like to search around otherwise I have a regular glutened recipe linked below or use the one posted with this recipe.


Lemon Ricotta Crepes
adapted from Real Simple

Crepes
1 1/2 cups whole milk
4 large eggs
1 cup all-purpose flour, spooned and leveled
3 tablespoons unsalted butter, melted, plus more for the skillet
1/4 teaspoon kosher salt
1/2 teaspoon finely grated lemon zest
2 teaspoons lemon juice

Glaze
1 thinly sliced lemon
1/2 cup plus
1 tablespoon sugar

Filling ( make ahead of time so flavors can combine)
1 cup ricotta
1 tsp lemon zest
1 tsp lemon juice
1 tablespoon honey, plus more for serving

I have a wonderful glutened Crepes recipe here, you can add the lemon juice/zest to the batter. OR use this recipe posted above:
In a blender, blend the milk, eggs, flour, butter, salt, lemon juice, and 1 tablespoon of the sugar until very foamy, about 1 minute. Transfer to the refrigerator and let rest, at least 30 minutes and up to 1 day.

Meanwhile, in a medium saucepan, boil 1/2 cup of water and the remaining ½ cup of sugar, stirring, until the sugar dissolves. Add the lemon slices and simmer until tender and translucent, 5 to 7 minutes; let cool.

Wipe a (8") medium nonstick skillet with butter and heat over medium heat. Add ¼ cup of the crepe batter and swirl the skillet so the batter completely covers the bottom of the pan. Cook until golden brown, 2 to 3 minutes. Gently loosen the edge of the crepe with a spatula and, using your fingers, flip the crepe. Continue to cook until cooked through, 1 to 2 minutes more. Transfer to a plate, layer between wax paper pieces. Repeat with the remaining batter.

In a small bowl, combine the lemon zest, ricotta, and honey. Dividing evenly, spread the ricotta mixture on the crepes (about 1 tablespoon each) and roll up. Serve topped with the lemon slices and drizzled with additional honey.

The crepes will keep layered between wax papers in a large baggie for a few days in the fridge. Just warm up in the microwave and add filling.

my gluten free lemon crepes, layered between wax paper

roll them or fold them


Please share this post if you liked it. =)

enjoy,

Sunday, April 21, 2013

Pineapple Pie


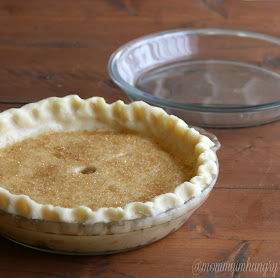
When I found this recipe, I thought it sounded delicious. You don't see recipes for pineapple pie like you do, say apple pie. This also reminds me of those little hand pies you can buy. I baked this up one morning to take to dinner at my Brother's to have with vanilla bean ice cream of course too. I was surprised how wonderful it was! It wasn't as sweet as I feared it would be, it was perfect. It even sliced beautifully. I will be making this again.

Please note there isn't a whole lot of filling, so your pie dish won't be full, I will use my shallow pie dish next time so I don't have so much empty crust, or maybe just use a regular pie dish and fold your crust down more (see pics). I wonder if you could double the filling to make a taller pie??


Pineapple Pie
from Fork vs Spoon

One prepared double pie crust, I used my gluten free recipe
1 – 20 ounce can Crushed Pineapple with juice (do not drain)
1/2 Cup White Granulated Sugar
3 Tablespoons Corn Starch
Pinch of salt
Milk
Sugar

In a medium saucepan, combine the crushed pineapple, sugar, corn starch, and salt. Place over medium heat. Bring mixture to a slow boil and cook, stirring often, until mixture has thickened and is no longer cloudy, but clear (about 3 to 5 minutes). Remember to keep stirring so the mixture doesn’t scorch. Once thickened, remove from heat and let cool.

Preheat oven to 375F.

Prepare your pie crusts, roll out. Lay your bottom crust into a *shallow pie dish, add cooled pie filling, either lay your top crust on top or do a lattice pattern (gluten free crust will not lattice). Trim off extra dough and crimp edges. Brush top with milk and sprinkle with sugar, cut vent holes.

Place in preheated oven and bake for 40 – 45 minutes until top is golden brown. Remove from oven and let cool (I baked mine in the morning, let it sit out and cool, then refrigerated for 1-2 hours, then took it over and it sat out for another 1-2 hours until after dinner and it set up nicely). Serve with vanilla ice cream!

(Remember gluten free pie crusts tend to take longer to brown, so I cover the top and let it bake maybe up to 20 minutes more so the bottom gets done)

not a lot of filling

my regular pie dish in front, my shallower one in back, note how low the pie sits in the dish.

see all that extra crust on the edges

I baked this 20+ minutes longer and see how the GF crust still isn't real dark on the bottom? 

Just like those little hand pies, but better!!


Please share this post if you liked it. =)

enjoy,

Monday, April 15, 2013

Homemade Fruit and Veggie Wash


I can remember buying a bag of apples once and no one was eating them. They tasted horrible! So I found this homemade fruit and veggie wash, and like magic, the apples tasted much better! The fruits and veggies tasted brighter, better and you could even smell the apples scent as they sit on the counter waiting to be eaten. Now each and every time I come home from the store, I grab this large bowl (it's actually my cake box cover lid) and fill it up and soak everything. I'll toss my tomatoes, celery, cucumbers, grapes, apples, oranges, berries really anything in there. That waxy build up will come off and all the dirt and grime gets left behind.

Homemade Fruit and Veggie Wash

Large bowl or clean sink
1 cup of white vinegar
warm/cool water
fresh fruits & veggies

Fill a large container (or your clean sink) with warm/cool water. Add 1 cup of white vinegar. Toss in your fruits and vegetables and allow to soak for about 10-15 minutes. Rinse well and dry off the produce.

yuck! That's stuff you'd be eating straight from the store.


See the dirty water (well strawberry fuzzies and some dirt)


Please share this post if you liked it. =)

enjoy,

Tuesday, April 9, 2013

Avocado Chocolate Pudding


WHAT?? you say! Avocado pudding? Yep! It's good, I promise. I did not tell my family what was in it even though they love avocados, they just knew it was creamy, silky, rich and chocolatey. In fact they couldn't finish their serving it was "very chocolaty" they say lol. I loved it, and have made it a couple times since for my chocolate cravings.


Avocado Chocolate Pudding 
slightly adapted from Seeded At The Table

2 ripe medium avocados, peeled and chopped
1/3 cup cocoa powder
1/4 cup honey
3/4 cup canned coconut milk + more if desired
1 1/2 teaspoon vanilla extract

Blend all ingredients, until smooth, in a food processor. May add more coconut milk for desired consistency. Chill for a few hours then serve.
Makes about 2 cups, 1/2 cup serving size.


Please share this post if you liked it. =)

enjoy,

Sunday, April 7, 2013

Buttermilk Syrup


This syrup will be a nice change from your maple syrup, we love it. It's a sweet, rich almost caramel like syrup perfect for pancakes and your other favorite breakfast goodies. I've blogged about it before but now it has it's own post. I recently used this on the Baked Blueberry Pancakes.


Buttermilk Syrup 
from allrecipes

1 1/2 cups sugar
3/4 cup buttermilk
1/2 cup butter
2 tablespoons corn syrup
1 teaspoon baking soda
2 teaspoons vanilla extract

In a medium heavy saucepan, combine the sugar, buttermilk, butter, corn syrup and baking soda. Bring to a boil over medium heat. Boil for 7 minutes. Remove from the heat; stir in vanilla. Serve. Store in a container in the refrigerator, reheat in the microwave for about 60 seconds or on the stove top.


german pancakes with buttermilk syrup


Please share this post if you liked it. =)
enjoy,

Saturday, April 6, 2013

Baked Blueberry Pancakes


The other morning I have my Nephews over and I made these baked pancakes with a homemade syrup. They all loved these and even had seconds! Since they loved them so much, I made my family them again this weekend. It's pretty much your favorite pancake batter, baked. No more standing there flipping and waiting for each little pancake. These are a new hit in our home and will be great for school mornings!

Baked Blueberry Pancakes
adapted from Big Red Kitchen 

1 1/2 cups milk
4 TBL melted unsalted butter
2 large eggs
1 tsp vanilla
2 cups all purpose flour
2 TBL sugar
4 tsp baking powder
1/2 tsp salt
1 cup blueberries, optional

Preheat oven to 350°. Lightly grease a 9x13 baking dish. In a large mixing bowl, beat together milk, butter, egg and vanilla. In another bowl, combine flour, sugar, baking powder and salt, stir into milk mixture until combined. Pour batter into prepared pan. Sprinkle with blueberries. Bake for 20-25 minutes. Serves 8-12.
(you can half this recipe for an 8x8 pan, same bake time)


with homemade buttermilk syrup

For our son's birthday breakfast, I added sprinkles to the batter and made a little glaze (and the same syrup) :)

and done chocolate chip style


Please share this post if you liked it. =)

enjoy,