Showing posts with label Desserts. Show all posts

Tuesday, November 25, 2014

Brazilian Chocolate Fudge Flan (Brigadeirão)


Does anyone still use Pinterest? I sure do and have been having great luck with delicious recipes lately! This is one I've had in my folder for quite a while and since it's easy and ingredients I had on hand I decided why not? If you love chocolate truffles you'll LOVE this! You know how they melt in your mouth? Yeah, that! It's pretty rich and creamy (like a thick pudding) so you won't need a large slice, so I think this would serve 15 well. I served it with whipped cream.


Brazilian Chocolate Fudge Flan
adapted from Brazil To You

14 oz sweetened condensed milk
14 oz whole milk
1 cup unsweetened cocoa powder
1/3 cup sugar
1/2 tablespoon plus 1/2 teaspoon cornstarch
1 tablespoon plus 1 teaspoon unsalted butter, melted
4 large eggs, at room temperature
1 tablespoon vanilla extract
A dash of salt
Whipped cream

Pre-heat the oven to 350º F. Spray a bundt pan with nonstick spray.
Blend together well the condensed milk, the whole milk, cocoa, sugar, cornstarch, butter, eggs, vanilla, and salt. Pour mixture into the prepared pan.
Bake in Bain-Marie for about 40 minutes (I placed my bundt pan inside of a large glass baking dish with water poured into the glass dish until it reached half way up the bundt pan.).
Let cool on a rack and then refrigerate for about 2-4 hours or longer.
Unmold carefully,  cut and serve with whipped cream.


enjoy,

Pin It!

Thursday, November 13, 2014

Gluten Free Pumpkin Spiced Pecan Glazed Donuts


For the longest time I've had my new donut pans...but it wasn't until I found a great sale on pumpkin that I decided to give them a try. I made these cake like pumpkin donuts with glaze and pecans. Ohhh were they delicious! So delicious, they didn't last the day with my family.

I did try out my mini donut pan, but found this batter to be too thick to put in a tiny space so I much preferred to use my bigger pan.


Gluten Free Pumpkin Spiced Pecan Glazed Donuts
Makes about 18 regular sized donuts. Adapted from Food by Teva and Pure 2 Raw

2-1/2 cups gluten free flour mix (such as this one)
1 cup light brown sugar
1/4 cup sugar
1-1/2 teaspoons baking soda
1 teaspoon xanthan gum
1 teaspoon salt
1 teaspoon ground cinnamon
1/4 teaspoon ground nutmeg
1/4 teaspoon ground ginger
3 eggs, beaten
1/2 cup canola oil
1 (14-oz) can pumpkin
2 teaspoons vanilla extract

Preheat the oven to 350ºF. Lightly oil a donut pan and set aside.
In a large mixing bowl, whisk together the flour, brown sugar, sugar, baking soda, xanthan gum, salt and spices.
Add in the eggs, oil, pumpkin and vanilla. Beat well for two minutes. The batter will be smooth and a little sticky.
Spoon the batter into the donut pan, filling almost to the top. Smooth the tops with wet fingers. Bake in the center of the oven for 18 minutes, until firm but slightly springy to the touch.
When the donuts are cool enough to handle, loosen the sides and remove from the pan. Place the donuts on a cooling rack. Glaze and sprinkle with nuts.


Glazed Pecan Topping

1 Cup pecans, ground

Cinnamon Sugar Glaze:
1 cup powdered sugar
1 1/2 tablespoons milk
1/2 teaspoon ground cinnamon

Place on cinnamon sugar glaze into a bowl and stir till combined. Grab a donut and dip into your cinnamon glaze then sprinkle with pecans. Allow to dry.


 enjoy,
Pin It!

Thursday, October 9, 2014

Pumpkin Swirl Brownies


 Everyone gets into this fall pumpkin everything baking theme... I love my pumpkin pie and a pumpkin muffin but not everything pumpkin, all of the time. BUT when I saw these I knew I had to give them a try now! I'll admit I was worried how they'd turn out...no flour, all that honey...I was worried they'd taste like honey and have no structure like brownies do. I went with it. Well I was happy to see them puff up as they were baking so that gave me hope of the texture thing. Then I could smell the honey baking and I got a little iffy. I went with it. They were done after about 40 minutes and I let them cool, then I put them in the fridge to help set up so I could slice and photograph...and taste. WOW, these are amazing!!! If you love pumpkin pie like I do, you'll love these! The moist pumpkin parts in these are deeelicious! They also held up holding to eat too.  Oh and the honey taste...you can't tell! I'm sorry I ever doubted these, I will make them again!


Pumpkin Swirl Brownies
adapted from fast Paleo

16 oz of walnuts (I used some walnuts & some pecans)
1 large egg
1/2 cup honey
1/2 cup baking cocoa
1 TBL vanilla
1/4 tsp salt
1 tsp baking soda
6 oz chocolate chips, divided

-Preheat your oven to 350 degrees F. Grease/parchment paper line a 9x13 baking dish.
Combine walnuts in a food processor and blend until it has the texture of almond butter. In a large bowl combine all ingredients (minus the chocolate chips) and mix until smooth, then stir in 3/4 of the chocolate chips. Set aside.

Pumpkin Mix: 
1 can pumpkin puree
1/3 cup honey
1 TBL cinnamon
1 tsp baking soda
1 large egg
1/4 cup almond flour
-Combine all and set aside.

Pour in the 3/4 of the brownie mixture into the pan and spread evenly (this is a very thin layer). Set aside the other 1/4. Take heaping spoonfuls of the pumpkin mixture and place on top of the brownie mixture in the pan until all pumpkin mix is used. Then add the rest of the brownie mix on top of the pumpkin and run a knife through the top layers making the chocolate and the pumpkin swirl, toss on the rest of the chocolate chips and bake for 40 minutes.


enjoy,
Pin It!

Friday, September 5, 2014

S'mores Pie


When I saw this recipe online, I knew I had to make it for one last little hoorah before I start back into my workout routine. I adapted it making it gluten free and of course my family couldn't tell. I used my favorite gluten free flour blend (linked) and made some GF graham crackers (links). I used both chocolate chips, because I already had them and some chocolate bars. It came out just fine.  This baked up all nice and puffy and just looked amazing! I tasted a bit and it reminded me of a big cookie, a rich big cookie! This will easily serve 8-12 people, you won't need a big piece. 


S'mores Pie
adapted from Wishes and Dishes, serves 8-12

1 stick Softened Butter
1/2 cups Granulated Sugar
1 whole Egg
1 teaspoon Vanilla
1 cup GLUTEN FREE All Purpose Flour
1 cup GLUTEN FREE Graham Cracker Crumbs
1 teaspoon Baking Powder
7 oz Marshmallow Creme
6 whole (1.55 Oz Bars) Hershey’s Milk Chocolate Bars, Unwrapped (I used about 7 oz chocolate chips)
1 cup Mini Marshmallows
1/4 cups Milk Chocolate Chips

Preheat oven to 350°F and spray a 9″ pie pan (or tart pan) with baking spray.
In a large bowl beat butter and sugar together until combined, then add egg and vanilla and stir them in. Stir in flour, graham cracker crumbs and baking powder.
Divide the dough in half. Carefully press half the dough in the bottom and up the sides of the prepared pie pan as best you can (I used wet hands, makes it easier). Evenly spread the Marshmallow Creme over the bottom crust.
Separate chocolate squares (or sprinkle chocolate chips) and place on top of the Marshmallow Creme.
Place the 1 cup of marshmallows on top.
Using the remaining crust, pat sections of dough on top of and around all the marshmallows (they will not be completely covered and that is what you want!).
Sprinkle with 1/4 cup chocolate chips, then bake 20 minutes until lightly browned.
Remove pan from oven and set it on a wire rack. Cool completely before cutting.

gluten free crust carefully pressed into tart pan 
(I like that it cuts pieces better than digging them out of a pie dish)

marshmallow cream spread

I used both chocolate chips & chocolate bars


plop pieces of GF crust for top all over and slightly press together


can I just eat it like that?

oh wow, look at that!!


go ahead, take a bite!


 enjoy,
Pin It!

Thursday, April 10, 2014

Chocolate or Vanilla Butter Cream Frosting


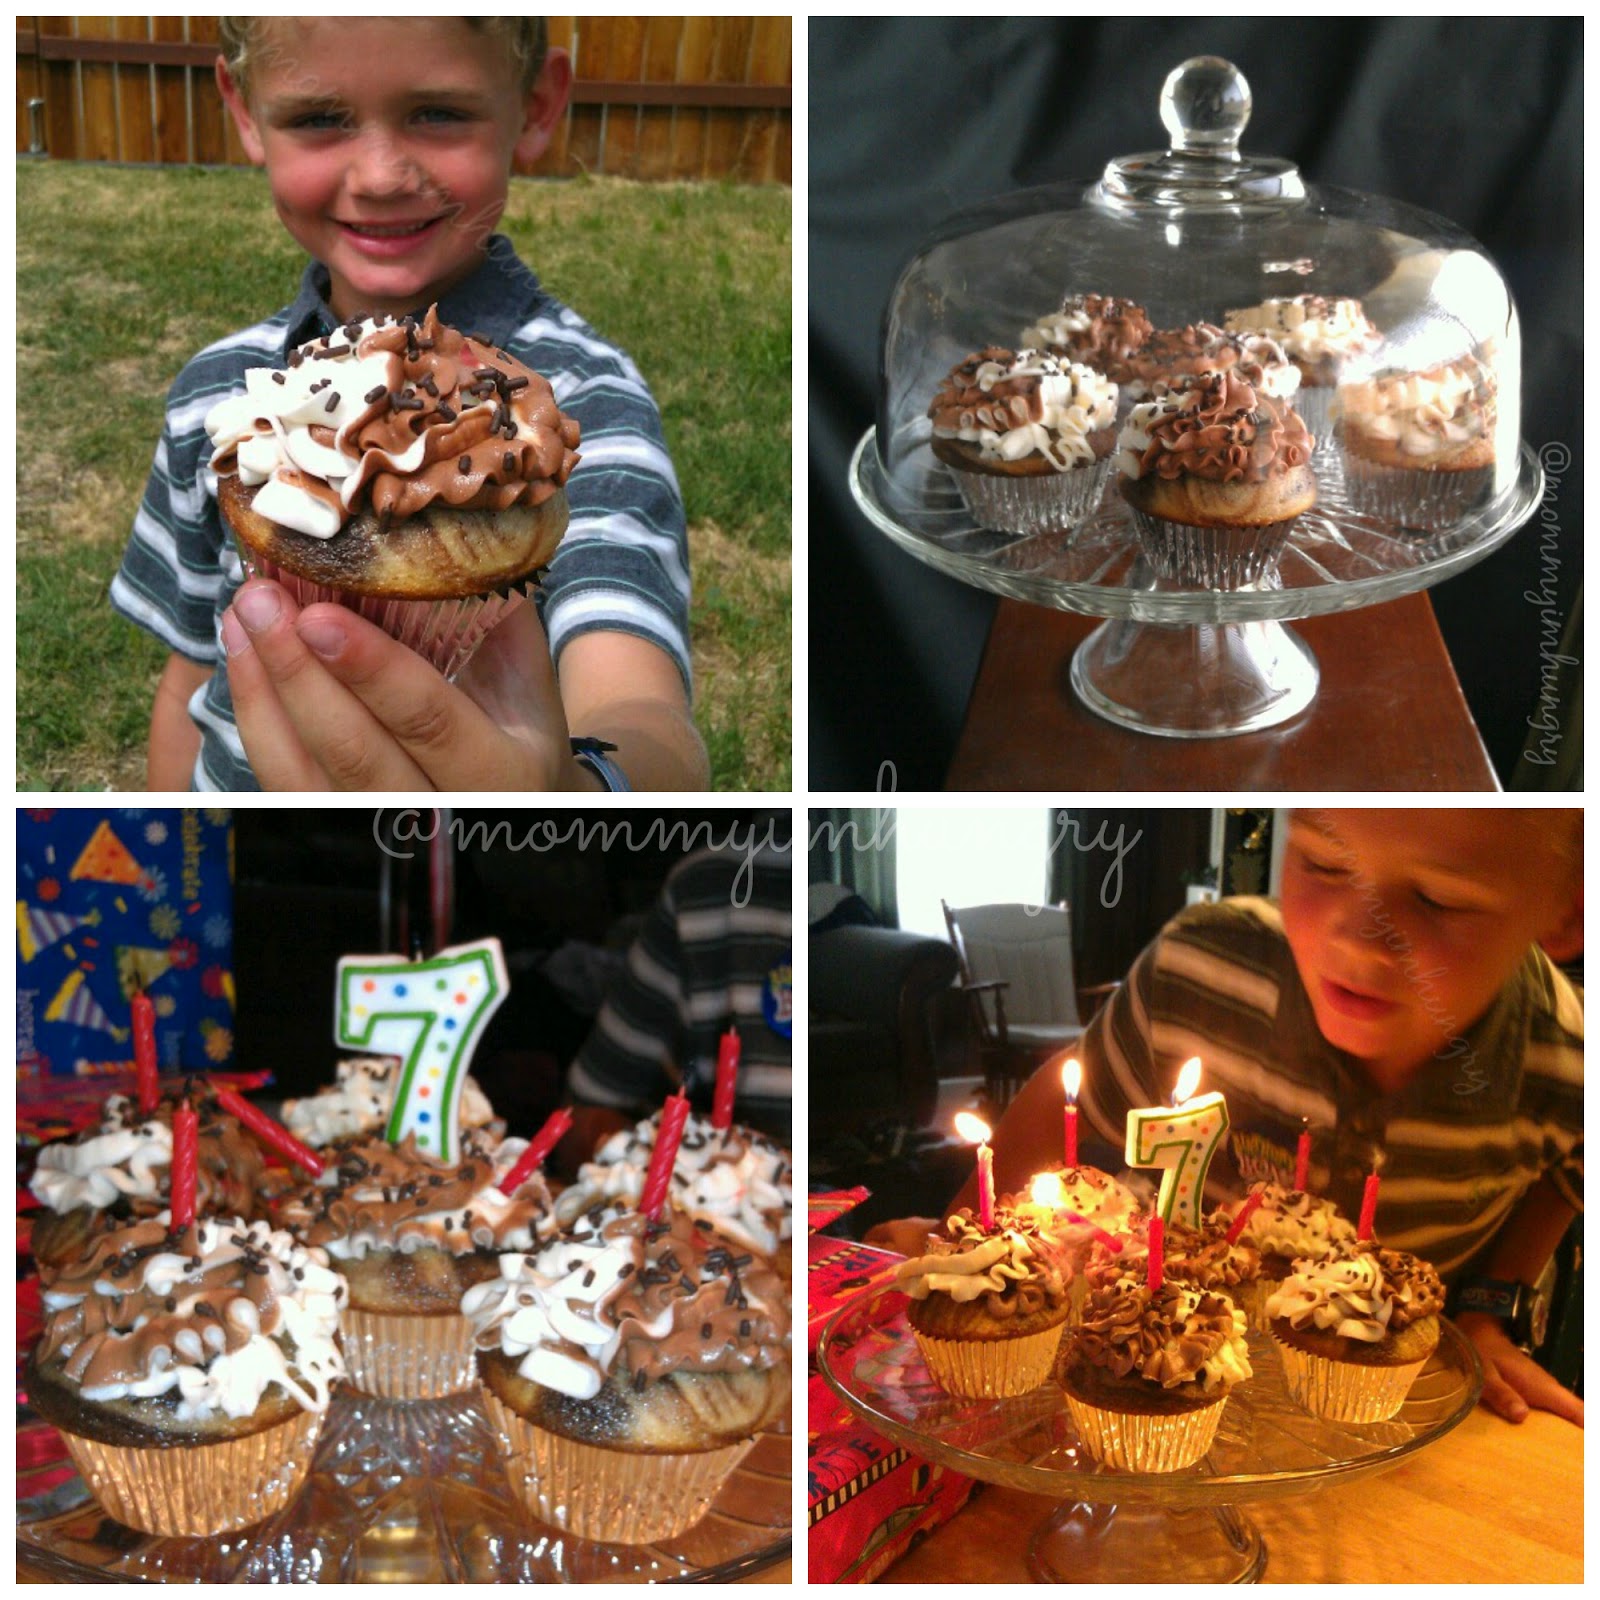
Our little boy, the baby of the family, turned 7 this week and he wanted chocolate cupcakes, but the others wanted vanilla so, I made a compromise for them. I combined a chocolate and a vanilla cake mix together, marbling them together before baking. I did the same with the butter cream frosting, mixing them both. I also scooped out the insides of the cupcakes and filled them too (see how to here). They get the both of both flavors with these special birthday cupcakes!

The chocolate frosting did not make enough to fill and frost my cupcakes so I do recommend at least doubling it for 24 cupcakes, plus with my ruffly icing it probably uses up more. By the way, I used a Wilton 2 D tip for that effect. Also this frosting will get melty in the heat so I kept these in the fridge until it was near time to serve.


Chocolate Butter Cream Frosting
Adapted from Allrecipes. Makes about 2 cups.

1/4 cup butter, softened
2 cups confectioners' sugar
3 tablespoons cocoa powder
1/8 tsp salt
2 teaspoons vanilla extract
2 tablespoons milk

Mix together butter, sugar, cocoa powder and salt until combined. Add in vanilla and milk and beat for an additional 3 to 5 minutes or until smooth and creamy.


Vanilla Butter Cream Frosting
Adapted from Food.com. Makes about 3 cups.

1 cup butter, softened
3 1/2 cups confectioners' sugar
1 teaspoon milk
2 teaspoons vanilla extract
1/8 teaspoon salt

In a bowl combine butter, sugar and salt. Beat till blended. Add the milk and vanilla and beat for an additional 3 to 5 minutes or until smooth and creamy.

For the combined swirly effect of my frosted cupcakes, I placed some chocolate frosting in one pastry bag and some vanilla in another bag and then added them both to a bigger pastry bag with a tip frosted away.


they loved them!

Happy Birthday Buddy!


 enjoy,
Pin It!

Tuesday, September 17, 2013

Lemon Cream Pie


...make a lemon cream pie! A neighbor of ours, gave us a 10 pound bag of their lemons fresh from their tree. Wow! Immediately the kids wanted me to make lemonade. Well I knew it wouldn't take all of these lemons so what else could I make? I've made lemon bars last time with all of my lemons so I wanted something different. PIE! I found this recipe and it sounded great. I used my gluten free pie crust recipe and decided to use my tart pan instead (I love that it's easier to remove the slices). I also opted for a chilled pie because our oven heats up this little house so the less time I have to use it, the better. You do use a pre baked pie crust though, but it doesn't take too long in the oven.

This pie is just wonderful!! It's cold, creamy, fluffy and melts in your mouth. I really loved it. It's not too tart, it's perfect. A perfect end to Summer and to welcome Fall. Oh, and yes I made them lemonade, and I'll blog that soon too. 


Lemon Cream Pie
adapted from Welcome Home 

1 pie crust recipe, pre baked and cooled (gluten free recipe here)
1 cup sugar
3 1/2 tablespoons cornstarch
2 tablespoon grated lemon zest
1/4 cup fresh lemon juice
3 egg yolks slightly beaten
1 cup whole milk
1/4 cup frozen butter, cut into small cubes
1 cup sour cream

Combine sugar, cornstarch, lemon zest, lemon juice, egg yolks and milk in saucepan, and cook over medium heat until thick (should take a few minutes). Stir in the frozen butter until melted, remove from heat and let cool to room temperature. Stir in the 1 cup of sour cream and pour into baked pie shell. Chill 6 hours or more, top with whipped cream before serving.


enjoy,

Pin It!

Sunday, May 5, 2013

Gluten Free Churros


Churros! Gluten Free Churros, yay!! Fried food, yum! Well since I haven't had a lot of fried food lately, and I had to do a review on a fryer, I decided for the first few times to keep it a dedicated gluten free fryer and to make these churros. (they can later use it for the beloved fried french toast)

I haven't had a churro in probably 2 years so I was really excited to see how these would turn out. This was my first time ever making a pâte à choux (and has been on my forever to-list) and I was impressed with how super easy that was. This dough is super thick so you'll need a heavy duty pastry bag to pipe these out. I made mine really long, but next time will make them the suggested 4" length so the fry time is shorter. These came out DEE-licious!! I couldn't fry them quick enough, once they were out of the oil and into the cinnamon sugar, we were gobbling them up! I even doubled the recipe because I knew they'd be a hit.


Cinnamon Churros 
adapted from Adventures of a Gluten Free Mom

1 cup Water
1/3 cup Butter
2 Tbs. packed Brown Sugar
1/2 tsp. Salt
1 cup Gluten Free Flour Blend (I used my fave mix here)
1 Egg
1/2 tsp. Vanilla
Oil for Frying

Cinnamon Sugar Topping 
1/4 cup Granulated Sugar
3/4 tsp. ground Cinnamon

In a medium saucepan, combine water, butter, brown sugar, and salt. Bring to boiling over medium heat Add flour all at once, stirring vigorously with a wooden spoon. Cook and stir until mixture forms a ball and pulls away from the sides of the pan. Remove from heat. Cool for 10 minutes. Add egg and vanilla, beating well with a wooden spoon.

Transfer mixture to a decorating bag fitted with a large star tip (I used my large fabric pastry bag and star tip, this dough is thick!).

Line a baking sheet waxed paper. Pipe 4×1-inch logs onto prepared baking sheet. Heat 3 inches of oil in a deep saucepan to 375 degrees F. Fry a few logs at a time in deep hot oil about 2 minutes or until golden brown on both sides, turning once (I used my little deep fryer). Drain on paper towels. Keep warm in a 300 degree F oven while cooking remaining churros. In a medium bowl, combine granulated sugar and cinnamon. Roll warm churros in cinnamon-sugar mixture to coat. Serve warm. Makes about 20 churros.


I piped them large (doubled recipe), apples are for the weights to hold the paper down


I decided on the last batch to cut them in half for quicker fry time


Please share this post if you liked it. =)

enjoy,
Pin It!

Monday, April 22, 2013

Lemon Ricotta Crepes


Funny how I've never made crepes before, and now I've made them a few times. They're really easy and you can fill them with anything. I made these for my Eggland's Best little breakfast. The lemon and ricotta were a lovely addition.

For these lemon crepes I used a gluten free recipe from a cookbook I blogged about here. I added in the lemon juice and zest. There are many GF recipes on the web if you'd like to search around otherwise I have a regular glutened recipe linked below or use the one posted with this recipe.


Lemon Ricotta Crepes
adapted from Real Simple

Crepes
1 1/2 cups whole milk
4 large eggs
1 cup all-purpose flour, spooned and leveled
3 tablespoons unsalted butter, melted, plus more for the skillet
1/4 teaspoon kosher salt
1/2 teaspoon finely grated lemon zest
2 teaspoons lemon juice

Glaze
1 thinly sliced lemon
1/2 cup plus
1 tablespoon sugar

Filling ( make ahead of time so flavors can combine)
1 cup ricotta
1 tsp lemon zest
1 tsp lemon juice
1 tablespoon honey, plus more for serving

I have a wonderful glutened Crepes recipe here, you can add the lemon juice/zest to the batter. OR use this recipe posted above:
In a blender, blend the milk, eggs, flour, butter, salt, lemon juice, and 1 tablespoon of the sugar until very foamy, about 1 minute. Transfer to the refrigerator and let rest, at least 30 minutes and up to 1 day.

Meanwhile, in a medium saucepan, boil 1/2 cup of water and the remaining ½ cup of sugar, stirring, until the sugar dissolves. Add the lemon slices and simmer until tender and translucent, 5 to 7 minutes; let cool.

Wipe a (8") medium nonstick skillet with butter and heat over medium heat. Add ¼ cup of the crepe batter and swirl the skillet so the batter completely covers the bottom of the pan. Cook until golden brown, 2 to 3 minutes. Gently loosen the edge of the crepe with a spatula and, using your fingers, flip the crepe. Continue to cook until cooked through, 1 to 2 minutes more. Transfer to a plate, layer between wax paper pieces. Repeat with the remaining batter.

In a small bowl, combine the lemon zest, ricotta, and honey. Dividing evenly, spread the ricotta mixture on the crepes (about 1 tablespoon each) and roll up. Serve topped with the lemon slices and drizzled with additional honey.

The crepes will keep layered between wax papers in a large baggie for a few days in the fridge. Just warm up in the microwave and add filling.

my gluten free lemon crepes, layered between wax paper

roll them or fold them


Please share this post if you liked it. =)

enjoy,
Pin It!

Sunday, April 21, 2013

Pineapple Pie


When I found this recipe, I thought it sounded delicious. You don't see recipes for pineapple pie like you do, say apple pie. This also reminds me of those little hand pies you can buy. I baked this up one morning to take to dinner at my Brother's to have with vanilla bean ice cream of course too. I was surprised how wonderful it was! It wasn't as sweet as I feared it would be, it was perfect. It even sliced beautifully. I will be making this again.

Please note there isn't a whole lot of filling, so your pie dish won't be full, I will use my shallow pie dish next time so I don't have so much empty crust, or maybe just use a regular pie dish and fold your crust down more (see pics). I wonder if you could double the filling to make a taller pie??


Pineapple Pie
from Fork vs Spoon

One prepared double pie crust, I used my gluten free recipe
1 – 20 ounce can Crushed Pineapple with juice (do not drain)
1/2 Cup White Granulated Sugar
3 Tablespoons Corn Starch
Pinch of salt
Milk
Sugar

In a medium saucepan, combine the crushed pineapple, sugar, corn starch, and salt. Place over medium heat. Bring mixture to a slow boil and cook, stirring often, until mixture has thickened and is no longer cloudy, but clear (about 3 to 5 minutes). Remember to keep stirring so the mixture doesn’t scorch. Once thickened, remove from heat and let cool.

Preheat oven to 375F.

Prepare your pie crusts, roll out. Lay your bottom crust into a *shallow pie dish, add cooled pie filling, either lay your top crust on top or do a lattice pattern (gluten free crust will not lattice). Trim off extra dough and crimp edges. Brush top with milk and sprinkle with sugar, cut vent holes.

Place in preheated oven and bake for 40 – 45 minutes until top is golden brown. Remove from oven and let cool (I baked mine in the morning, let it sit out and cool, then refrigerated for 1-2 hours, then took it over and it sat out for another 1-2 hours until after dinner and it set up nicely). Serve with vanilla ice cream!

(Remember gluten free pie crusts tend to take longer to brown, so I cover the top and let it bake maybe up to 20 minutes more so the bottom gets done)

not a lot of filling

my regular pie dish in front, my shallower one in back, note how low the pie sits in the dish.

see all that extra crust on the edges

I baked this 20+ minutes longer and see how the GF crust still isn't real dark on the bottom? 

Just like those little hand pies, but better!!


Please share this post if you liked it. =)

enjoy,
Pin It!
Related Posts Plugin for WordPress, Blogger...