Tuesday, November 23, 2010

Sweet Onion Tartlets


Sweet Onion Tartlets
adapted from Sandra Lee

4 tablespoons butter
1-2 Vidalia sweet onions, diced, about 3 cups
1 pie dough
3 large eggs
1 1/3 cups half-and-half
1 (1.3-ounce) envelope dry onion soup mix (such as Lipton)
1 tsp each, pepper, parsely, garlic powder
3 TBL sliced green onions
1/2 cup shredded Monterey Jack cheese
Preheat oven to 350 degrees F.

-Melt butter in a large frying pan over medium heat. Add onions and cook until golden brown. Set aside to cool.
-Roll out pie dough. Use a 2 1/2-inch round cutter and cut as many rounds as possible (about 14 to 16), reserving scraps repeat with second pie dough. Gather together scrap dough and cut out as many rounds as needed to make 36 in total. Fit dough rounds into cups of mini muffin pan. (TIP: Prep ahead, freeze tartlet doughs in pans to mold, then unmold and place in freezer safe bag, when ready to use place back into pans and bake). Pre bake: Place in the oven and bake for 10 to 12 minutes. Remove and set aside, to fill.
-In a blender, blend together eggs, half-and-half, golden onion soup mix, pepper, garlice powder, parsely and green onions. Set aside.
-Divide onions among tartlet shells, about 1/2 teaspoon each. Add egg mixture until tartlet is almost full, then sprinkle on cheese. Bake for 20 minutes.

 1 pie crust gave me 46 mini tarts.

I have been making these for a few years now, and we just love them! I usally do them for appetizers before the Holiday meal. I use Dorie Greenspan's pie crust recipe for this:

Good for everything pie dough
-Dorie Greenspan

1 1/2 cups all-purpose flour
2 T sugar
3/4 tsp salt
1 1/4 sticks (10 T)very cold (frozen is fine)unsalted butter, cut into tablespoon-size pieces
2 1/2 T very cold (frozen is even better) vegetable shortening, cut into 2 pieces
About 1/4 cup ice water

Put the flour, sugar and salt in a food processor fitted with a metal blade; pulse just to combine the ingredients. Drop in the butter and shortening and pulse only until the butter and shortening care cut into the flour. Don’t overdo the mixing — what you’re aiming for is to have some pieces the size of fat green peas and others the size of barley. Pulsing the machine on and off, gradually add about 3 tablespoons of the water — add a little water and pulse once, add some more water, pulse again and keep going that way. then use a few long pulses to get the water into the flour. If, after a dozen or so pulses, the dough doesn’t look evenly moistened or form soft curds, pulse in as much of the remaining water as necessary, or even a few drops more, to get a dough that will stick together when pinched. Big pieces of butter are fine. Scrape the dough out of the work bowl and onto a work surface.

Shape the dough into a disk and wrap in plastic. Refrigerate the dough for at least 1 hour before rolling. (If your ingredients were very cold and you worked quickly, though, you might be able to roll the dough immediately: the dough should be as cold as if it had just come out of the fridge.)


*please note all product reviews and giveaways are posted here now http://ldylvbgr.blogspot.com/

Follow my new recipe url so you can get all the latest goodies!

enjoy,


Sunday, November 21, 2010

Trick or Treat Candy Cookies


If you happen to still have leftover chocolate Halloween candy, this would be a great recipe to use them in! I specifically picked out an assortment of chocolates from the kid's bags, and hid it! I wasn't sure what to name these, my son called them Halloween cookies, I call them Trick or Treat Candy Cookies. Basically it's a chocolate chip cookie recipe, but with all the chopped up candy instead of the chocolate chips, and minus a little sugar too. They turned really good (but not so photogenic) and the candy seemed to disappear in them, but Mr. especially loved them. I scooped these with my large ice cream scooper (about 1/4 C), so they are big fat cookies!


Trick or Treat Candy Cookies
adapted from Picky Palate

2 sticks softened butter
1/2 C + 2 TBL sugar
3/4 C + 2 TBL packed light brown sugar
2 extra large eggs
2 Tablespoons pure vanilla
3 3/4 Cups all purpose flour
1 1/2 teaspoons baking soda
3/4 teaspoon salt
2 Cups assortment of chocolate Halloween candy, cut up
1. Preheat oven to 350 degrees F. In a stand or electric mixer beat the butter and sugars until well beaten. Beat in eggs and vanilla until well combined. Place flour, baking soda and salt into a large bowl; mix. Slowly add to wet ingredients along with the Halloween candy.
2. Scoop 1/4 Cup of dough (I used my big ice cream scoop) onto lined cookie sheet. Bake for 15-17 minutes, until edges just start to turn golden brown. Let cool for for a few minutes then transfer to cooling rack.
that's a yellow M&M and probably a Milky Way there


*please note all product reviews and giveaways are posted here now http://ldylvbgr.blogspot.com/
Follow my new recipe url so you can get all the latest goodies!

enjoy,

Friday, November 12, 2010

Cookie Dough Brownies


A while ago I made these wonderful sounding chocolate chip cookie dough cupcakes...but yikes all that butter, and the brown sugar made me think of these as brown sugar cakes! We ate some anyways, and the rest went to the neighborhood kids.


Anyways I wasn't as crazy about them like I thought I'd be, and I had so many cookie dough balls leftover, I kept them frozen for later use. Since there's no egg in them, they're OK to eat like that. You may want to half the recipe, or not. So I decided that I'd use them in some brownies! Yeah, those came out great! I used a boxed recipe (for an 8x8 pan) I was reviewing and just added the cookie dough balls on top.


Cookie Dough Balls as seen here
2 sticks softened butter
3/4 cup sugar
3/4 cup brown sugar
4 tbsp milk
1 tbsp vanilla
2 1/2 cups all purpose flour
1/4 tsp. salt
1 cup mini chocolate chips

To make the cookie dough, combine the butter and sugars in a mixing bowl and cream on medium-high speed until light and fluffy, about 2 mins. Beat in milk and vanilla until incorporated and smooth. Beat in the flour and salt until just combined. Stir in the chocolate chips. Using a 1.5 tbsp scoop, shape the dough into balls or tubes. Freeze on a parchment lined baking sheet overnight. (These make a good 3 dozen!)

Make an 8x8 pan (or 9x13) of brownie batter, add the cookie dough balls to the top and bake according to brownie directions.


Photobucket

*please note all product reviews and giveaways are posted here now http://ldylvbgr.blogspot.com/
Follow my new recipe url so you can get all the latest goodies!
enjoy,

Tuesday, November 9, 2010

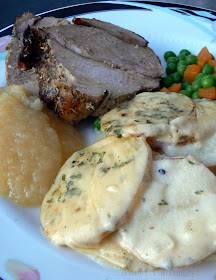
Pork Roast and Cheesy Scalloped Potatoes


I may have found our favorite scalloped potato recipe. You make a cheese sauce then pour it over the thinly sliced potatoes and bake. I used my food processor to slice the potatoes nice and thin. We ate these with a simple pork roast. Also this makes a 9x13 pan size, so it could easily be halved to make an 8x8 pan. Mr. mentioned adding in sour cream to this (because his mom made it that way) which sounds great! Maybe once the cheese is melted, take it off the heat and stir it in, perhaps 1/2 C.? I will have to try that next time!


Cheesy Scalloped Potatoes

slightly adapted from Excellent Eats

4 Tbl Butter
4 Tbl flour
4 C milk, warmed
1 tsp salt
1 Tbl Parsley flakes
dash of pepper
1 tsp garlic powder
1 tsp onion powder
2 C shredded cheddar cheese/jack blend
6 C thinly sliced potatoes (6-7 medium size potatoes)


Preheat oven to 375.
In a saucepan, melt butter over medium heat. Mix in the flour and salt, and stir constantly with a whisk for one minute. Stir in milk. Add salt, pepper, and parsley. Cook until mixture has thickened. Stir in cheese all at once, and continue stirring until melted, about 30 to 60 seconds.
In a greased 9x13 pan, place a layer of potatoes, and then a layer of cheese sauce. Repeat until your ingredients are gone, ending with the cheese sauce on top.
Cover with foil and cook for 30-35 minutes. Remove tinfoil and continue cooking another 30-35 minutes or until potatoes and tender.


For the pork roast, this was about a 1 1/2 lb boneless loin roast (Costco special). I used Rosemary, Sage, Thyme, garlic powder, onion powder, salt and pepper as a rub, with a little oil to help coat the roast. Let that sit on the roast for a few hours in the fridge before roasting. Place on a roasting rack in a pan, roast at 425' for about 50-60 minutes. Check roast at about 50 minutes, look for any bloodiness and let it roast a little longer if needed (I like to do mine until it reaches 155' with a thermometer, letting it rest 10 minutes when it's done will also bring the temp up, so keep that in mind). Slice thick 3/4"-1" slices and serve. This small roast fed all 5 of us with a few slices for leftovers.


*please note all product reviews and giveaways are posted here now http://ldylvbgr.blogspot.com/
Follow my new recipe url so you can get all the latest goodies!

enjoy,

Friday, November 5, 2010

Polynesian Chicken Salad


I thought this sounded great one night after I saw it in an email. The flavors were great, but the ramen noodles were throwing me off. Next time I'd probably omit them. I added in some purple cabbage as well, but as a word of caution if you do, it turns everything else purple. Purply pineapple is not pretty.  =)

Polynesian Chicken Salad
slightly adapted from Betty Crocker

2 teaspoons sesame seeds
2 cups water
1 package (3 oz) chicken-flavor ramen noodle soup mix (I would omit next time)
1 can (8 oz) pineapple tidbits (or slices -cut up), drained, 2 tablespoons juice reserved
2 tablespoons white vinegar
2 tablespoons reduced-sodium soy sauce
1 tablespoon honey
1/2 teaspoon ground ginger
3 cups shredded cabbage
1 cup cut-up cooked chicken
8 medium green onions, sliced (1/2 cup)
1/2 cup shredded carrot

1.Toast sesame seeds in a dry hot skillet, stirring often until golden. Only takes a few minutes, keep an eye on them. Set aside once done.
2.In 2-quart saucepan, heat water to boiling. Break up ramen noodles before opening pouch. Remove seasoning packet from pouch. Add ramen noodles to boiling water. Cook 2 to 3 minutes, stirring occasionally, until noodles are tender; drain. Rinse in cold water to cool; drain.
3.In small bowl or 1-cup measuring cup, mix reserved pineapple juice, 1/2 teaspoon seasoning from ramen seasoning packet, the vinegar, soy sauce, honey and ginger. Set aside.
4.In large bowl, mix noodles, pineapple, cabbage, chicken, onions and carrot. Stir in dressing and sesame seed.


*please note all product reviews and giveaways are posted here now http://ldylvbgr.blogspot.com/
Follow my new recipe url so you can get all the latest goodies!

enjoy,

Thursday, November 4, 2010

Garlic Chicken Kiev


When I worked in a deli, we made chicken kiev. It was so good! I've never made them at home before, so I looked up a recipe that came in an email. It seemed pretty easy to do, mix a seasoned butter, chill it. Flatten chicken breasts (TIP: use a heavy sauce pan to pound it out) and add some butter, then roll up. Well, the rolling up part is a little tricky. Be sure to have some toothpicks on hand to help hold it together and close any openings. These were really good, except my butter ended up only at one end of the chicken, so be sure to place the butter in the middle, not at the end, then roll up.


Garlic Chicken Kiev
adapted from Betty Crocker

6 tablespoons butter
2 tablespoon chopped fresh chives or parsley (I used both)
1/2 teaspoon garlic powder
6 small boneless skinless chicken breast halves (1 1/2 pounds)
2 cups Panko
2 tablespoons chopped fresh parsley
1/2 teaspoon paprika
1/4 cup buttermilk
.
1.Mix spread, chives and garlic powder; shape into 3x2-inch rectangle. Cover and freeze about 30 minutes or until firm.

2.Heat oven to 425°F. Spray baking sheet with cooking spray. Flatten each chicken breast half to 1/4-inch thickness between sheets of plastic wrap or waxed paper. (be careful not to rip them apart)

3.Cut chives butter lengthwise into 6 pieces. Place 1 piece on center of each chicken breast half (width way to how you're rolling them up). Fold long sides of chicken over chives mixture; fold up ends and secure any openings with toothpicks.

4.Mix panko, parsley and paprika. Dip chicken into buttermilk, then coat lightly and evenly with panko mixture. Place chicken, seam sides down, in pan. Spray tops of chicken with non stick spray (or drizzle with melted butter to achieve more brownness).

5.Bake uncovered about 30-35 minutes or until chicken is no longer pink in center.


*please note all product reviews and giveaways are posted here now http://ldylvbgr.blogspot.com/
Follow my new recipe url so you can get all the latest goodies!

enjoy,

Monday, November 1, 2010

Frosted Zucchini Brownies


The gooey frosting photo sold me on these! But really, these were a hit, zucchini and all! At first I didn't tell them and no one knew, but when my oldest saw me talk about them on Facebook, the secret was out. lol. We all liked these, and I will be making them again!

*I wanted to add that when you make the batter for this, it will be dry and crumbly. Just pat it into the pan and once baked, it'll be gorgeous brownies!
*I am now making the frosting first and setting it in the fridge to chill and set up more while the brownies back and cool. The frosting will be runnier frosting, don't expect a butter cream texture.

*1/2014: I have made these successfully gluten free, see recipe.

Frosted Zucchini Brownies
from blogchef

Chocolate Frosting-
6 tablespoons unsweetened cocoa powder
¼ cup butter
2 cups confectioners sugar
½ cup milk (could use 1/4 c.)
½ teaspoon vanilla extract

½ cup canola oil
1 ½ cups white sugar
2 teaspoon vanilla extract
2 cups all purpose flour ( I used 2 C. of my gluten free flour blend)
½ cup unsweetened cocoa powder
1 ½ teaspoons baking soda
1 teaspoon salt
2 cups fresh zucchini (shredded)
½ cup chopped walnuts,optional

Pre-heat the oven to 350 degrees.

To make the frosting- In a small saucepan over low heat melt together the cocoa powder and margarine. Set aside to cool. In a medium bowl, with a mixer, blend confectioner’s sugar, milk, and ½ teaspoon vanilla extract. Stir in the margarine/cocoa mixture, allow to mix for a couple of minutes. Set in fridge to chill and set up more. Spread over cooled brownies, allow to set up (I placed mine in the fridge for a couple hours) then cut into squares. The longer these brownies sit, the thicker the frosting will become.

Grease and flour a 9×13 inch baking dish. (I lined with parchment)
In a large bowl mix together oil, sugar and 2 teaspoons of vanilla extract until well blended. In another bowl combine the flour, ½ cup cocoa powder, baking soda and salt. A little at a time stir into the sugar mixture. Fold in zucchini and walnuts. The batter will be dry and crumbly, don't worry. Spread the mixture evenly into the prepared baking dish, lightly press.
Place into the oven and bake for 25-30 minutes until the brownies spring back when gently touched. Remove from the oven and allow them to cool before frosting.


UPDATE:
1/21/2014, I made a gluten free version, swapping the flour. It came out just as wonderful!

For the frosting today, I used 2 TBL less milk and added a little bit more powdered sugar. It's still runnier, but works. I just sliced the brownies and added some frosting before serving. 


Sharing a piece with


enjoy,